CAS Servers
CAS stands for Central Authentication Service, and is a single sign-on protocol for the web. Its purpose is to permit a user to access multiple applications while providing their credentials only once.
Configure CAS Single Sign-On Options
Select Single Sign-On from the Navigation pane to display the list of existing SSO servers.
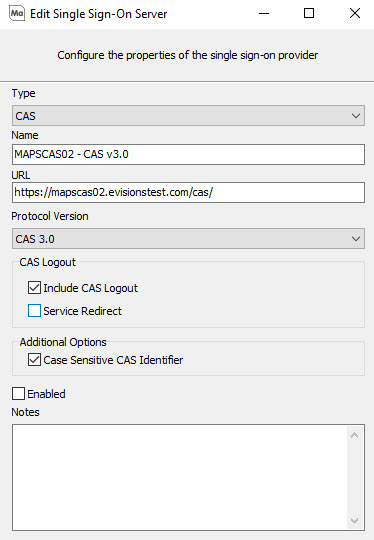
Select a server from the list, or select Add Server to configure a new server. When the Edit Single Sign-On Server dialog box displays, select CAS as the server type from the first drop down if you are adding a new CAS server.

CAS Server Configuration
Enter the server name (friendly name) in the Name field, and enter the URL to the base path of the CAS server in the URL field.
- The server name is only used to identify the CAS server in MAPS, and can be anything you like.
- The URL must be the base path on the CAS server, in UNC format. The base path is the login URL for the CAS server, without the '/login' at the end. In the example below, the normal login URL for the CAS server is
https://evitesting.evisions.com:8443/cas/login
Note that the URL uses secure HTTP (https). In order to use CAS, MAPS must be configured for HTTPS.
Depending on how your CAS server is set up, you may or may not need to include the port number in the URL.
For the Protocol Version, select the protocol your CAS server uses (2.0 or 3.0). Note that the protocol version is not the same as the CAS service version.
CAS Logout Options
These options control what happens when a user (who is logged in via CAS SSO) selects Log Out from a MAPS application.
- Select the Include CAS Logout option if you want to end the MAPS CAS session when a user logs out of the eLauncher. This ensures a proper logout from the CAS server. When selected, the Service Redirect option becomes available.
- Select the Service Redirect option to redirect the user back to the eLauncher (instead of the CAS portal page) after the session ends.
When using the Service Redirect option, you need to enable the service redirect on the CAS server, as well. Refer to the documentation for your CAS server for details.
Additional Options
Select the Case Sensitive CAS Identifier option if you want the CAS identifier to be case sensitive.
- The option is already selected for existing CAS servers (to retain previous functionality)
- The option is not selected by default for new servers.
User Configuration
When adding users individually, each MAPS user (or LDAP user added to MAPS) can be associated with the CAS identifier that they use to log in to the CAS server. You can enter the CAS identifier on the CAS tab of the User Properties dialog. You can also use the user import function to add CAS identifiers to new or existing users. The CAS identifier must be unique for each user -- you may not use the same CAS identifier for multiple MAPS or LDAP users.
LDAP Group Configuration
MAPS supports LDAP group authentication for CAS users. This allows you to add your LDAP groups to MAPS, and have your CAS users authenticate based on membership in these groups.
In order to use this feature, you will need to add the groups attribute to your CAS server, in addition to the CN and DN attributes that are required to access your LDAP server. For assistance with adding attributes, please refer to the CAS documentation. You can also refer to their tutorial on Active Directory authentication with CAS.
MAPS expects an XML response from the server.
- If a user is a member of more than one group, the groups can be listed in a single <cas:Groups> node, with each group separated by a space, like this:
<cas:Groups>[CN=MyGroup1,OU=Groups,DC=Test,DC=Local, CN=MyGroup2,OU=Groups,DC=Test,DC=Local]</cas:Groups>
- The CAS 3.0 protocol also supports <cas:memberOf> instead of <cas:Groups>, so the response from the server may also look like this:
<cas:memberOf>[CN=MyGroup1,OU=Groups,DC=Test,DC=Local, CN=MyGroup2,OU=Groups,DC=Test,DC=Local]</cas:memberOf>
- For MAPS 6.1 and later, the XML response from the server can also be in the following format:
 <cas:attributes>
      <cas:CN>P1234567</cas:CN>
      <cas:Groups>CN=group1,OU=Groups,DC=evisions,DC=com</cas:Groups>
      <cas:Groups>CN=group2,OU=Groups,DC=evisions,DC=com</cas:Groups>
      <cas:Groups>CN=group3,OU=Groups,DC=evisions,DC=com</cas:Groups>
   </cas:attributes>
When MAPS receives the response, it grants the user all of the permissions assigned to groups that match the groups in the response.
For more information on configuring groups to work with CAS authentications, see Using Groups with Single Sign-On.
After adding the LDAP group information to your CAS users, the only configuration you need to do in MAPS is to add your LDAP groups and assign appropriate permissions to each group. For users logging in with CAS, MAPS will automatically detect the group membership information from the CAS response and grant them the appropriate permissions for their LDAP group(s).
Note: CAS authentication is not supported for users who are members of nested LDAP groups.
Troubleshooting Tip: You can look at the debug log in MAPS while attempting to log in through CAS to verify that the response from the CAS server is in the correct format.
If your institution is already using CAS, you may have LDAP users who have been added to MAPS with their associated CAS IDs. If these users exist in MAPS only for purposes of associating the CAS ID with their username, you can remove these users from MAPS once they can authenticate via their group membership.
If you do not wish to remove these users, or if they must be added to MAPS individually due to additional permissions granted on an individual basis, you should continue to enter the CAS Identifier in MAPS for these users. If your institution has more than one LDAP server, use the CAS identifier to ensure that only the correct user is given permissions if different users on different LDAP servers share the same LDAP username.
Using a DN Response with MAPS Groups
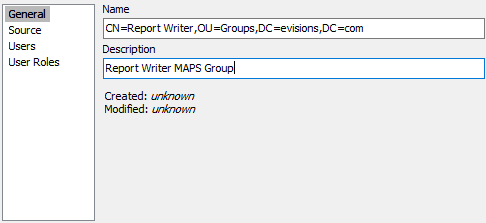
If you cannot configure LDAP groups within MAPS, you can still use a DN response to identify a user as a member of a MAPS group. To do this, you must name the MAPS group to match the DN attribute exactly.
For example, you would configure a group like this:

Launching MAPS Applications
To access the eLauncher using CAS, users click a specially-formatted link that tells the CAS server to redirect them to the MAPS eLauncher. Normally, the launch page is:
https://server.name
which refers the user to:
https://server.name/index.html
With CAS, the link becomes the CAS base path, followed by a call to the CAS login function, and then the "service=" parameter for the login function, which gives the link to the eLauncher. For example:
https://cas.server.name:8443/cas/login?service=https%3A%2F%2Fserver.name%2Findex.html
Each slash and colon in the "service=" parameter is replaced by its hex equivalent (%3A for the colon, and %2F for each slash). This link should be placed on the portal or main page the users log in to. When they click the link, they are automatically logged in to MAPS if they are already logged in to CAS, or prompted to log in to CAS if they are not.
Linking Directly to Argos Dashboards and Reports
To access an Argos report using CAS, the URL format is similar to accessing the launch page. However, the part of the URL that contains the path to the report is left in its original format.
The path to an Argos dashboard (without CAS) is:
https://server.name/Argos/AWV/#explorer/Folder/Dashboard%20Name
The path to a report underneath the dashboard (without CAS) is:
https://server.name/Argos/AWV/#explorer/Folder/Dashboard%20Name/Report%20Name
Using CAS, the path to access an AWV report is:
https://cas.server.name:8443/cas/login?service=https%3A%2F%2Fserver.name%2Fargos%2FAWV%2F#explorer/Folder/DataBlock%20Name/Report%20Name%20Report
The '/' characters after the '#' in the path are not converted to '%2F' because the Web Viewer treats everything after the # as a path parameter.
Using CAS, the path to access an Argos X report is:
https://cas03.evisionssupport.com:9443/cas/login?service=https%3A%2F%2Fargos.evisions.app/explorer/Support/Users/UserName/Address%20Information%2F%3Fserver%3Dmaps.evisionssupport.com